Cutting
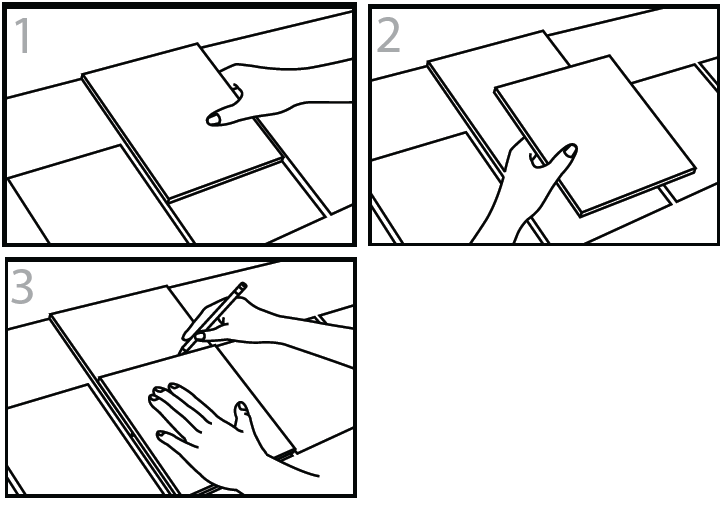
1. Place a loose tile atop the last full tile and position it to butt against the wall or corner,
or edge where tile stops.
2. Lay a second loose tile over the first and align it with the last full tile.
3. Mark the cut line on the “sandwiched” tile. Remember to allow for grout lines and a gap of
1/8 in. to 1/4 in. where the tile butts walls and other surfaces. Due to variations in wall
runs, each tile should be butted, measured and cut individually (rather than taking a single
measurement and cutting a number of tiles at once). For straight cuts, use a tile cutter.
“Polish” the edges with a rubbing brick.
Applying the Mortar & Installing Tile
Begin installing at the center point of the surface and move
outward, one quarter at a time. For floors, work toward the
exit to avoid stepping over freshly-laid tile. When this is
unavoidable, kneel on a plywood sheet.
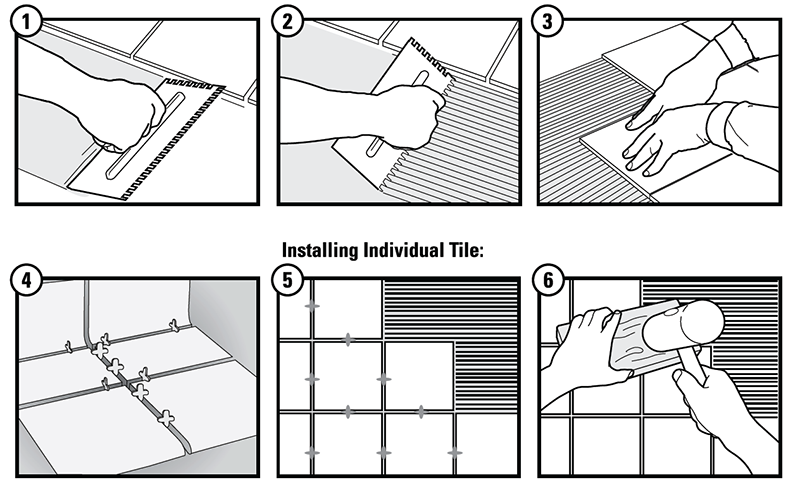
1. With the flat edge of the trowel, apply adhesive or thinset
at the intersection of the guidelines. Be sure to apply
an even coat. Work only a three sq. ft. area at a time, or
the area that can be covered with tiles before thin-set or
adhesive loses tackiness to the touch (see picture 1).
2. Now go back and “comb” the material with the notched section of the trowel, forming
ridges for better adhesion (see picture 2).
3. Press the tile into position at the intersection of the lines, with a slight twisting motion.
(see picture 3). Do not slide the tile into place. Use spacers between tiles (see picture 4)
to maintain joint width. Install tile in a step-like fashion, working upward and outward.
This permits easier adjustment of tiles if there is an error (see picture 5).
 Complete one quarter first before going to the next. If the mortar or adhesive starts
to “skin-over” on the surface before you lay the tile on it, scrape it off and apply
new adhesive.
Complete one quarter first before going to the next. If the mortar or adhesive starts
to “skin-over” on the surface before you lay the tile on it, scrape it off and apply
new adhesive.
4. Periodically check to see that joints are straight and even. Once aligned, tamp down
tiles with a beating block and mallet to ensure tiles are level (see picture 6). If adhesive
or thin-set oozes from joints, wipe with warm, soapy water. 2/3 of tile thickness in the
grout joints should be clean to allow for grout.
5. Clean tools with warm, soapy water while adhesive is still wet.
6. Let tile sit before grouting; see product packaging for details on wait times.

Grout and Caulk
Before you start:
1. After you have waited the appropriate amount of time as per mortar
instructions, make sure mortar is dry and tile is firmly set.
2. Remove all tile spacers.
3. Tile should be clean and dry.
4. Expansion joints (where tile meets adjacent walls, floors, or fixtures) should
not be grouted. Instead, use Caulk (see Caulking Section).
Installing Grout
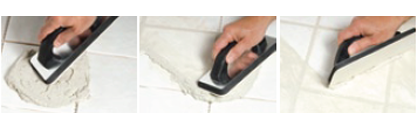
1. Many people find it easiest to pack the grout into the joints using the
small end of the grout float (rather than the long end). This is an
appropriate method, however, you should still use the long end to
scrape excess grout off of the tile.
2. After you have applied the grout, be sure to wait the appropriate
amount of time before you start sponge clean-up. Touch grout after
30-60 minutes. Grout should be firm, not soft. If there is no residue on
your finger, grout is ready to clean.
3. Use as dry a sponge as possible for the clean-up steps, otherwise you
will likely just be pulling pigment out of the grout joints. The goal is to
not disturb the grout lines. First, use a circular motion to loosen grout
haze and tool the joints.
4. For a second clean up, use the sponge to wipe the surface diagonally
across the tiles and grout joints holding sponge flat to the surface. This
should also help to smooth out the grout joints. Do not leave excess
water pooled on the joints.
5. Clean the sponge frequently, and wring out as much water as possible
each time.
6. Replace the bucket of clean-up water frequently